Swap-bot Time: April 19, 2024 12:56 pm
www.swap-bot.com

TPS: Slip Me Some Skin #1 **Edited**

Launch gallery slideshow

TPS:  Slip Me Some Skin #1  **Edited**
Group:The Print Shop
Swap Coordinator:dobie256 (contact)
Swap categories: Printmaking 
Number of people in swap:4
Location:International
Type:Type 3: Package or craft
Last day to signup/drop:March 3, 2014
Date items must be sent by:March 21, 2014
Number of swap partners:2
Description:

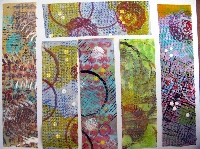
I'll post this swap one more time. It is slightly time consuming -- although I can make a plate and have it ready to pull in 30-40 minutes. I usually make one at the end of a work session while I am cleaning up my studio. If there is no participation for this one I will drop the idea.

For this swap you will need normal Gelli mono-printing supplies + clear packaging tape + perfect pearl powders (or some talcum powder).

Step 1: Build your design using acrylic paints on your Gelli plate. Remember you are building from the surface of the plate up -- whatever shows on top when you pull your skins is what will show. Let you paint elements dry thoroughly between steps. You can leave open areas (places where the Gelli plate shows through) or cover the entire surface with paints. Let the paint TOTALLY DRY on your plate.

Design ready to pull

Step 2: Line up your tape with the edge of the plate, carefully press it into the paint, then carefully peel it off. The paint will lift off with the tape leaving a clean Gelli Plate. I can get three strips off of my 6 x 6" plate. On my big plate I go across the short direction and get 5 strips. Of course you could go the long direction too.

Step 3: The back of your tape will be slightly sticky (no open areas on the design) to very sticky (lots of open areas on your design). For gorgeous tape brush the back side with perfect pearl powders. Their color will show through to the front. You could probably get by with talcum powder on designs without much open area. You just want to get rid of all of the tack -- UNLESS you want to use these skins as a tape. In that case I would line them up on some parchment paper? or other non-stick surface so that they can be pulled off later and used as tape.

Edited Addition: In the comments section @trula mentioned backing the sticky areas with a light weight paper -- book pages, washi tape, tissue paper. That would be fine for this swap if you don't want to use the Perfect Pearl powders.

Design with open areas

Detail showing the gold perfect pearl powder

Design with little open area

For the swap I figured two partners each. You need to send five skins and the each must be a unique design (so you can do five plates, pull several skins from each plate, then send each partner a set of mixed skins). I'll make the minimum length approximately 6" but they can be longer if you have bigger plates. These skins are to have non-sticky backs. They should easily go in a regular envelope (no folding them over though) but please put a bit of waxed paper between the layers of skins to prevent any sticking together.

Swap Requirements:

Send each of TWO partners a set of FIVE DIFFERENT skins

Minimum length of ~6" long

Skins are to have non-sticky backs

Skins need to be mailed between layers of waxed paper (or other non-stick papers)

Discussion

trula 02/ 3/2014 #

Hi! I have made gelli plate skins before where I have left a good amount of paintless area, but instead of putting powder on the back, I have then stuck them on cool paper such as tissue paper, washi paper, or book pages. Then the paper shows through the open areas. Is this acceptable, or would you rather no paper on the backs? If you would rather no paper, just say so, no problem. Thanks!

dobie256 02/ 5/2014 #

I don't have a problem with that -- since I am requiring that they have non-sticky backs. Having papers showing through would be lovely. Just please keep the papers light-weight -- like the examples you mentioned -- so that the skins remain flexible for future projects.

trula 02/ 5/2014 #

Thanks for the clarification!

And for anyone who is unsure about how this works or on the fence about it, look at this post on the gelli arts blog. And WATCH THE VIDEO! The video is seriously inspiring enough to convince someone who has never heard of a gelli plate to buy one right away!

dobie256 02/ 6/2014 #

@turla Thanks for the blog link! I had seen the video but it is nice to have written instructions (other than mine) in case they are clearer to the reader. I hope lots of members join this swap. It is really fun to make skins!

crescendo 02/ 6/2014 #

I hadn't seen that film, WOW I am sold! I'm going to make them first before signing up for the swap, that is my new MO to keep my stress level down. Plus now that I understand we are just sending 5 strips, not 5 full-size plate pieces! That had me intimidated.

dobie256 02/ 6/2014 #

Nope just five little strips to each partner. They should fit easily in a standard business envelope if you want to go that route. If this swap is popular I will run it fairly often so I want to keep it easy, fun, and cheap! ;)

Susi 02/ 9/2014 #

WOWZA, how awesome is that?? I'd not seen the video either, and wasn't aware of the technique. I'll have to give it a couple of tries before I join any swaps though, lol!

dobie256 02/10/2014 #

I have received several comments as to how time consuming these are. I tend to do them at the end of my printing sessions. They do take a bit of time because they have to dry thoroughly before you can pull them. I plan on running this swap every month or so -- if there is enough interest -- so if you don't get five strips done for this one just tuck some aside to be ready for the next one. Like all Gelli printing they are very addictive!

trula 02/10/2014 #

I think that I'll be ready but like others, I like to get a good start on the swap before I sign up ;). Would it be too much of a spoiler to post a pic of my ready-to-pull plate? I might have to anyway!

dobie256 02/11/2014 #

Well you have seen a couple of mine in the tutorial :). They look pretty different once they are cut down into strips so I don't think it will be too much of a spoiler.

trula 02/14/2014 #

Well, I might be on hold until next month. For whatever reason, the awesome plate that I created just didn't work! The tape hardly pulled up any paint! Maybe I waited too long to pull the paint(it took me 3-4 days to complete the plate)? Still working on it; I have another plate drying as I type.

piratecaptainmo 02/20/2014 #

I spent two full days making these this weekend. Totally addictive. I think I made about 70 strips!

dobie256 02/22/2014 #

Whew! So glad someone got it to work well and enjoyed the process. I think they are really cool. Great job on producing 70 strips. Looking forward to seeing what you do with all of them! :)

piratecaptainmo 02/22/2014 #

I used most of them o make some bookmarks for sale, and a few I used in ATCs.

Leave a Comment

You must be logged in to leave a comment. Click here to log in.

I received the item
I sent the item

Received from:
For multiple members, separate names with spaces

Description: