
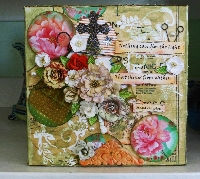
Mixed Media swap send 12 items of mixed media
Launch gallery slideshow
| Swap Coordinator: | jledford012 (contact) |
| Swap categories: | Art Challenges Handmade |
| Number of people in swap: | 2 |
| Location: | Regional - united states |
| Type: | Type 3: Package or craft |
| Last day to signup/drop: | August 16, 2020 |
| Date items must be sent by: | August 21, 2020 |
| Number of swap partners: | 1 |
| Description: | |
|
Mixed Media swap send 12 items of mixed media tp your partner. I just thought of trying my hands on this art and felt that Mixed Media is a great way to express things deeply felt, but not easily conveyed with words…By combining components, layering finishes, and including items of significance to you, art can be made that is truly a reflection of who you are. Mixed media art brings together all of your artistic skills, even if they’re not as good as you’d like them to be, to create pieces that will release your creativity. This form of crafting is perfect for all those who are beginners to crafting as well as not very good with drawing, but still want to make something. Many of us need to ability to create something as part of fulfilling an inner need. So continue reading to see if this mode of creativity helps you. Mixed media art is a term used to describe the bringing together of a multitude (“mix”) of different elements (“media”) in a variety of different ways. So many different art and craft techniques and forms are covered by this title. And then there’s the range on media: Firstly the ones that come straight to mind; paints, papers, cardboards, pencils, images, glues, crayons and glitter, to name a few. Then there are the more obscure media, like washers and other hardware items, buttons, fibers, bees wax, pages from an old book and the list goes on. When you begin to look around you with your “mixed media mania” everything becomes a potential target for adding into your mixed media art things u could send just some examples paint stencils chalk glitter embossing powder alcohol inks oil-based paints tea leaves flower petals Any type of textures, memorabilia chalkboard paint and spray paint to fabric paint music sheets Crochet and Embroidery images from glossy magazines and newspaper clipping photos, or even print out your own pics to work with. buttons large rhinestones paint chips cloth, wood, paper game pieces, toys colored pencils or marker jewelry old or new even broken keys tags flowers or rossettes ribbon and lace Vintage books, papers ephemera Brushes, Straws, Sponges Pieces of bubble wrap, cardboard tubing, fruit netting Makeup Wands Makeup wands are a great tool for creating lots of small line marks quickly. They are designed to be heavily loaded with mascara and work wonderfully with paint and ink. Dip the wand in acrylic ink and brush along your substrate. The first stroke line will be much heavier followed by thinner, more defined lines. Paint will give an even heavier, less defined impression. Cotton Swabs Easy to find and budget friendly, cotton swabs make great mark makers and are handy in a pinch as a detail brush. The absorbent quality of these tools make them great for ink and paint, allowing a longer open time with the medium as you work. Many of these tools are double ended, giving you the added bonus of working with two colors at once. Clothespins Use a recycled clothespin to create a series of nearly identical marks. Dip either of the two wooden ends into paint or ink, and press firmly onto your substrate. You will be able to make a large number of marks quickly given that every imprint will form two marks. This is my suggested list of basic supplies. Pick and choose, you don't have to have everything. You could manage with paper, pens and glue to start with. Acrylic paint in the three primary colors: red, blue and yellow, plus black and white. You will use a lot of paint so buy in large tubes or containers. It doesn't have to be artist quality. Craft paint is fine. White Gesso - A primer that can also be mixed with paint. It adds texture to backgrounds and can be built up in layers. Gesso also comes in clear and black Paint brushes – get a cheap set; you're going to kill them anyway with all the gluing. Old magazines. Scrapbook papers (not essential). Glue – I use glue sticks, PVA, Mod Podge and Golden Gel Medium. You don't need them all, plain old PVA will be fine. Paper towel rolls for cleaning up and dabbing your brushes dry. A piece of sequin waste, sometimes called 'punchinella'. Styrofoam/polystyrene pieces. Bubble wrap. Watercolor soluble crayons - useful in so many ways. A little costly but well worth it. Graphite pencils plus a charcoal pencil. Black pens – choose waterproof Sakura Pigma Micron or Sharpies. Found objects/embellishments – string, yarn, buttons, coins, washers, fabric scraps, paper scraps. Look for interesting things that could be used as stamps or stencils. One of my most useful things is a piece of plastic that came out of my fridge – it was part of a shelf meant for eggs so has lots of perfectly round holes in it. Mixed Media Backgrounds - First Layers You may be working in a book, on watercolor paper, a board or on canvas. You can even use discarded cardboard packaging. If the support (surface) is thin or very porous, it will require priming with acrylic gesso. I love making backgrounds, it's my favorite part; it's all about experimenting and having fun with color. Here are some techniques for backgrounds: Tip: have a hairdryer or preferably a heat gun to speed up drying time. Paint all over with one layer of acrylic paint. You can experiment with mixing colors. Use undiluted. Allow to dry. Paint with a thin layer of gesso. Again, let it dry and use another paint color; this time dilute it with water so the first color glows through. Do the same as before, adding some torn paper text onto the first layer of paint. Glue the pieces on randomly, let them dry and continue with the other layers. Take an old credit card and scrape a layer of paint. While it is still wet, scrape another color in the opposite direction. Collage the whole surface with paper scraps, then gesso. Use your fingers to rub paint over the surface to show up the texture. You can do the same thing with tissue paper. Glue it down and encourage it to crinkle. It must be bone dry before adding paint. Get hold of some cheap mini spray bottles, dilute some acrylic paint with water and spray the paints on to the surface. You could lay objects down – punchinella, elastic bands, plastic combs, string, bottle tops, anything to provide a stencil. Get a piece of flat styrofoam – mine comes from frozen pizza packaging. Get a ballpoint pen and draw a design into the foam. Paint it with acrylic and press it onto your paper. Instant stamp at almost no cost at all – and someone got pizza. Make lots of these. 23 FeltMagnet»Drawing»Journaling Techniques for Mixed Media Layering Updated on November 29, 2018 theraggededge profile image Bev G more I've been creating since I was a child. My hobbies include watercolor, drawing, art journaling, painting rocks, sewing & crochet. Source Layered Mixed Media Art on a Budget There is a tidal wave of supplies for mixed media coming onto the market daily... and I find myself being swept along with it all – wanting, nay, needing all the latest inks, metallics, stamps, stencils, art papers, crayons and specially mixed signature paints – you name it, it's on my wish-list. And none of it is cheap – especially if you buy whole sets of designer products. I was going through some old art journals the other night and what struck me was how I had been able to produce a wide variety of pages using very few materials. Face-palm moment - I don't need a great stack of art supplies to make mixed media art. Come and have a browse through some of my old journals and I will share with you some simple techniques to add color and layers to your art - whether it be in books, on paper - or anything else that you want to decorate with layered mixed media. Source The journal above is made from some left-over book packaging. I gessoed it, painted it, stamped it, painted some more, added bubble-wrap stamping, collaged it with a face and flowers I'd previously drawn, stamped some text, highlighted some areas with pen and shaded other areas with charcoal. Source Budget Art Supplies This is my suggested list of basic supplies. Pick and choose, you don't have to have everything. You could manage with paper, pens and glue to start with. Acrylic paint in the three primary colors: red, blue and yellow, plus black and white. You will use a lot of paint so buy in large tubes or containers. It doesn't have to be artist quality. Craft paint is fine. White Gesso - A primer that can also be mixed with paint. It adds texture to backgrounds and can be built up in layers. Gesso also comes in clear and black. Paint brushes – get a cheap set; you're going to kill them anyway with all the gluing. Old magazines. Scrapbook papers (not essential). Glue – I use glue sticks, PVA, Mod Podge and Golden Gel Medium. You don't need them all, plain old PVA will be fine. Paper towel rolls for cleaning up and dabbing your brushes dry. A piece of sequin waste, sometimes called 'punchinella'. Styrofoam/polystyrene pieces. Bubble wrap. Watercolor soluble crayons - useful in so many ways. A little costly but well worth it. Graphite pencils plus a charcoal pencil. Black pens – choose waterproof Sakura Pigma Micron or Sharpies. Found objects/embellishments – string, yarn, buttons, coins, washers, fabric scraps, paper scraps. Look for interesting things that could be used as stamps or stencils. One of my most useful things is a piece of plastic that came out of my fridge – it was part of a shelf meant for eggs so has lots of perfectly round holes in it. Source Source Source Mixed Media Backgrounds - First Layers You may be working in a book, on watercolor paper, a board or on canvas. You can even use discarded cardboard packaging. If the support (surface) is thin or very porous, it will require priming with acrylic gesso. I love making backgrounds, it's my favorite part; it's all about experimenting and having fun with color. Here are some techniques for backgrounds: Tip: have a hairdryer or preferably a heat gun to speed up drying time. Paint all over with one layer of acrylic paint. You can experiment with mixing colors. Use undiluted. Allow to dry. Paint with a thin layer of gesso. Again, let it dry and use another paint color; this time dilute it with water so the first color glows through. Do the same as before, adding some torn paper text onto the first layer of paint. Glue the pieces on randomly, let them dry and continue with the other layers. Take an old credit card and scrape a layer of paint. While it is still wet, scrape another color in the opposite direction. Collage the whole surface with paper scraps, then gesso. Use your fingers to rub paint over the surface to show up the texture. You can do the same thing with tissue paper. Glue it down and encourage it to crinkle. It must be bone dry before adding paint. Get hold of some cheap mini spray bottles, dilute some acrylic paint with water and spray the paints on to the surface. You could lay objects down – punchinella, elastic bands, plastic combs, string, bottle tops, anything to provide a stencil. Get a piece of flat styrofoam – mine comes from frozen pizza packaging. Get a ballpoint pen and draw a design into the foam. Paint it with acrylic and press it onto your paper. Instant stamp at almost no cost at all – and someone got pizza. Make lots of these. Adding Layers to Mixed Media Art I love adding layers, it's also my favorite part; be bold and don't worry about the end result. Make a border. Collage some scrap paper or scribble a border with water-soluble crayons. Entirely up to you whether you activate them with water or not. Alternatively, take your black pens and doodle all round the edges. Cut out interesting images from magazines – faces, food, cars, watches, text, animals, trees, anything that takes your eye. My kids and I sometimes spend an afternoon going through old National Geographics and cutting out things we think would be useful for collage. We do spend quite a lot of time reading the articles too – as a home-schooling mama, I like the idea of learning while playing! Lay down your collage pieces, move them around the page until you have made a layout that appeals. Glue the pieces into place. Once they are dry, take a soft graphite pencil or charcoal pencil and go round the edges lightly. Smudge the graphite/charcoal with a finger or a paper blender. This integrates the collage to the background and gives a nice grungy look. I bet you have been using paper towels to wipe your brushes on and clean up spills as you go, yes? Well go get them out of the trash and carefully spread them out. Look at those colors! If you want you can glue them directly on to your page, or maybe, you'd like to iron them first? Tear into strips and leave gaps in between so your background shows through. Add more paint if you wish. Anything goes! Take a small piece of bubble wrap, paint the bubbly side with white acrylic paint and stamp it on to your page. Let it go over some of the collage. Get your child to draw pictures for you. My daughter is great at portraits – she draws very spontaneously and loves to let me have them for my journals. Sorry so long, i wanted to give some great ideas. Have fun and any questions feel free to send a message | |
Discussion
Leave a Comment
You must be logged in to leave a comment. Click here to log in.
- Info:
- Home
- |
- About
- |
- Forum Rules
- |
- Terms of Use
- |
- Press
- |
- Advertising
- |
- Blog
- |
- Graphics & Stuff
- Help:
- New User Info
- |
- FAQ
- |
- Group Info
- |
- Glossary
- |
- Forums
- |
- |
- Contact Admin