
S: Beginner Zentangle
Launch gallery slideshow
| Swap Coordinator: | dobie256 (contact) |
| Swap categories: | Art |
| Number of people in swap: | 5 |
| Location: | International |
| Type: | Type 3: Package or craft |
| Rating requirement: | 4.95 |
| Last day to signup/drop: | February 15, 2013 |
| Date items must be sent by: | March 8, 2013 |
| Number of swap partners: | 1 |
| Description: | |
|
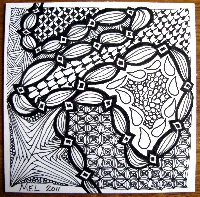
OK let's do a beginner zentangle. Zentangles are more than just doodling on paper. But that does NOT mean that you should be intimidated to try them! Especially in this swap and in this group. So anyone who has wanted to trying zentangling just dive right in. There are a few "official rules" to zentangling and lots of "official patterns" -- I say hooey to that! :) I'll provide a couple of links to my favorite sites but then I will tell you how I approach them. Hopefully you will find the experience enjoyable. ANYONE can do zentangling! And most people, with a bit of practice, can do it well. In a nutshell: in my understanding zentangling was developed to help challenged students (autism) focus their concentration. So unlike doodlings zentangles are the carefully drawing of a REPEATED pattern. I believe it is a form of self-hypnosis. You focus on carefully drawing a repeated pattern as neatly as you can. That's it. Everyone can do that! While you are drawing (and focusing on the lines) you shut out the rest of the world. You take deep breaths. You relax. If you do that your zentangle will be a success (even if it has a couple of squiggly lines in it). Here is the official Zentangle site if you want to meet the developers and learn about the history of the art. I am going to throw the official statement in here (The Zentangle® art form and method was created by Rick Roberts and Maria Thomas and is copyrighted.) but since I am not making any money off of this swap no worries. This is my FAVORITE pattern site! There are tons of cool patterns, they are alphabetical, they load quickly, and each and every pattern has detailed steps in how to draw them. Easy peasy. Pick a couple of patterns you like. Practice them a couple of times on scrap paper. Some I love the looks of are a pain to draw! So starting out pick 2-3 patterns you LIKE to draw. Have fun. Relax! Now that all of the background stuff is done, here is the nitty gritty "zentangle" stuff!
Basic steps for a zentangle Cut your paper to size. With a pencil LIGHTLY draw a squiggle or two across your paper. This line is called the 'string." It just defines the areas for your patterns. The string can be left plain and disappear into your final design or the string can actually be drawn in a zentangle pattern. An couple easy string patterns are Barberpole and Frillee A fun but slightly challenging one is Japonica Here is the beginning of a zentangle I did on a big calendar sheet. string You can see how I drew the string. In this particular example I did tangle patterns on the entire string but you don't have to do that. You can just leave the string a plain line. You can also see on this example all the open areas -- which I later filled in with patterns. pattern fill Once your string is drawn you now fill in the remaining areas with patterns of your choice. One of the "rules" of zentangling is to not guide yourself with pencil lines and never use an eraser. But I often lightly sketch in grid marks or tick marks so that my pattern will fit and is balanced. And I do erase pencils lines when I am done. I am not much for rules. :) Maybe someday I will be good enough to not need a pencil to guide me but until then I don't worry about it. I also still practice my patterns on scrap paper -- especially new patterns I haven't tried before. Here is the nitty gritty swap requirements stuff: One beginner zentangle to one partner Black and white zentangle Once we get a couple under our belts we can play with shading and color. Use at least three different patterns on your zentangle You can use the same pattern in a couple different areas if you have a complex string. Size is sender's choice -- from these options: ~~~traditional 3.5" x 3.5" zentangle tile ~~~standard postcard - approximately 4 x 6" mailed naked or in an envelope ~~~standard notecard - 4.25" x 5.25" include an envelope ~~~oversized notecard - 5x7" or 6x6" etc. include an envelope Relax, focus, and enjoy yourself (yes this is a requirement) Don't judge your beginning zentangle too harshly! (also a requirement) Last step -- please carefully erase any stray pencil lines PLEASE email me with any problems, questions, or concerns! Look around you -- on your clothes, your wallpaper, the carpet, silverware and stemware, building architecture, the sides of buses -- you will start seeing repetitive patterns everywhere! They are nothing new. | |
Discussion
Leave a Comment
You must be logged in to leave a comment. Click here to log in.
- Info:
- Home
- |
- About
- |
- Forum Rules
- |
- Terms of Use
- |
- Press
- |
- Advertising
- |
- Blog
- |
- Graphics & Stuff
- Help:
- New User Info
- |
- FAQ
- |
- Group Info
- |
- Glossary
- |
- Forums
- |
- |
- Contact Admin