
New Mail Art Technique #1: Distress Ink
Launch gallery slideshow
| Swap Coordinator: | StarryNights (contact) |
| Swap categories: | |
| Number of people in swap: | 15 |
| Location: | Regional - USA |
| Type: | Type 3: Package or craft |
| Last day to signup/drop: | February 18, 2015 |
| Date items must be sent by: | February 28, 2015 |
| Number of swap partners: | 1 |
| Description: | |
|
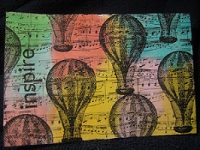
This is the first in a series of swaps I will be hosting that will allow you to try and learn a new technique for your mail art. This first one is called "watercolor ink technique" and makes a neat background using Tim Holtz distress inks. I have about 8 of the million different colors of the distress inks and absolutely love them, but wanted to use them for more than just distressing or stamping. Please read the entire swap description. I know it's long, but it will ensure you do the swap correctly and contains all the information for this new technique. If you don't have any Tim Holtz distress inks don't worry! :) I have tried this using regular markers and it works just as well. First you will need the following items:
Here's what you do to make the "watercolor ink" background:1) Choose 2 or 3 colors of distress ink or markers that you want to use. You can use more, but I've found that using about 3 colors makes for a prettier background. 2) Get out your large acrylic block and dab the distress ink colors you have chosen all over the block. If you're using markers you will need to color the sections of the acrylic block. 3) Spritz water over the block. You don't need to spritz heavily. Just enough to cover the area and make sure it's wet. 4) Place your white cardstock directly on top of the wet ink and press down. Some water may ooze out. Peel the paper up and continue to dab it on the block until your paper is covered in the ink. 5) That's it! :) You can use your heating tool to dry it or allow it to dry on its own. Now that you have your background you can decorate the rest of the postcard how you'd like. Use stamps, paint, glitter, watercolor pencils or markers, collage, gel pens, paint pens, etc. Put your best effort into it. Make something you'd be proud to send and receive. You must have a 4.98, 15 type 3 swaps completed and rated and no 1's or 3's in the last six months. I reserve the right to ban anyone who doesn't meet the requirements and anyone I deem iffy or a potential problem swapper. Video tutorial using this technique: Click Me! The first technique shows you how to do this, but there are several techniques shared in the video for Tim Holtz distress inks.If you have any questions about the technique or the swap feel free to PM. | |
Discussion
Leave a Comment
You must be logged in to leave a comment. Click here to log in.
- Info:
- Home
- |
- About
- |
- Forum Rules
- |
- Terms of Use
- |
- Press
- |
- Advertising
- |
- Blog
- |
- Graphics & Stuff
- Help:
- New User Info
- |
- FAQ
- |
- Group Info
- |
- Glossary
- |
- Forums
- |
- |
- Contact Admin