
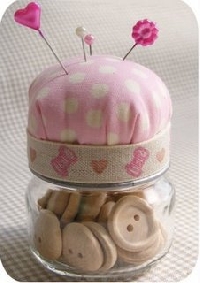
Baby Food Pincushions
Launch gallery slideshow
| Group: | Pincushions and Needlebooks |
| Swap Coordinator: | sewcrafty (contact) |
| Swap categories: | Craft Supplies |
| Number of people in swap: | 4 |
| Location: | International |
| Type: | Type 3: Package or craft |
| Last day to signup/drop: | August 17, 2009 |
| Date items must be sent by: | September 7, 2009 |
| Number of swap partners: | 1 |
| Description: | |
|
I saw a request for a swap of these little cuties. So here we go. Make one really cute baby food jar pincushion. Don't have a baby to steal the jar from? Me either. Any small size jar will do. I have small nutella jars or marinated artichoke jars I stash. This size is fine too. Here's a tutorial link- http://www.craftpudding.com/2009/03/tutorial-baby-food-jar-pincushion.html You'll have 1 partner, make 1 pincushion, try to read your partner's profile and make her something she'll really like. This should be really light to mail just make sure to get out the bubble wrap shipping glass. For a heart include some supplies inside the jar, buttons, pins, ribbon, elastic, velcro dots, measuring tape, so many options. Have fun with this one. They could come out really cute. | |
Discussion
Leave a Comment
You must be logged in to leave a comment. Click here to log in.
- Info:
- Home
- |
- About
- |
- Forum Rules
- |
- Terms of Use
- |
- Press
- |
- Advertising
- |
- Blog
- |
- Graphics & Stuff
- Help:
- New User Info
- |
- FAQ
- |
- Group Info
- |
- Glossary
- |
- Forums
- |
- |
- Contact Admin