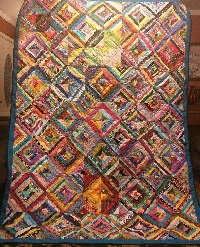
QnT Heartstrings quilt Blocks USA 2017 #1
Launch gallery slideshow

| Group: | Quilts n' Things |
| Swap Coordinator: | perkl8r (contact) |
| Swap categories: | Fabric Sewing Quilting |
| Number of people in swap: | 7 |
| Location: | Regional - USA ONLY |
| Type: | Type 3: Package or craft |
| Last day to signup/drop: | April 14, 2017 |
| Date items must be sent by: | May 15, 2017 |
| Number of swap partners: | 2 |
| Description: | |
|
QnT Heartstrings quilt Blocks USA 2017 #1 4-14-17 THRU 5-15-17 Here we go making one of my favorite fun quilt blocks! This is a relatively simple quilt block and it's definitely addictive!! So, get out your scraps and leftover jelly roll strips and join us. This swap is for all levels of quilters. It doesn’t matter how long you have been quilting - you just need to be accurate. You will be making 4 blocks each for your 2 partners (a total of 8 blocks). Don’t forget to make a couple blocks for yourself. INSTRUCTIONS: We will use the foundation fabric method. This means that we use a piece of muslin or flannel or any color or print fabric (as long as it is 100% cotton) as the base for our squares. This will stabilize the square and make it easier to assemble. Starting in the center you add your first strip of fabric and building from it on either side until you fill up your base fabric. BE SURE TO PRESS after each strip is added so no puckers or pleats will appear on the block. Please use this method – do not use the paper piecing method. The blocks we are making will be 6 ½ inches square when mailed. I would recommend that you make your base fabric about 7 inches square, so that if there is any “shrinkage†due to sewing, you will have a bit extra room to compensate for it. Once you finish adding all the strips to your base fabric, turn it over and trim the scraps hanging off so that you end up with a nice neat 6 ½ inch by 6 ½ inch block. If needed you can also trim the square down to 6 ½ inch by 6 ½ inch as well. . REMINDERS: --- It is very important to iron each strip down before adding the next strip. --- The same print fabric can only be used in a square 2 times. --- avoid plain fabrics --- The squares are supposed to be scrappy, the scrappier the better! So please don’t try to coordinate things. Just grab a strip and sew. --- Strips should VARY IN WIDTH, BUT BE NO WIDER THAN 1-3/4 inches UNFINISHED (BEFORE being sewn down). This will allow for the blocks to have about 10-14 different fabrics each. --- Please use decent quality 100% cotton fabric . I borrowed this swap data from my good friend beancounter17 who hosted a series of these swaps a few years back. I have a huge Rubbermaid tub full of colorful strips of fabric just waiting to be used on these blocks. I hope the instructions are clear and they tempt you to join the fun. Last year I used the blocks I had accumulated to make a quilt that I donated to our family Thanksgiving reunion as a door prize. It was a great success. It is the picture posted on this swap. | |
Discussion
Leave a Comment
You must be logged in to leave a comment. Click here to log in.
- Info:
- Home
- |
- About
- |
- Forum Rules
- |
- Terms of Use
- |
- Press
- |
- Advertising
- |
- Blog
- |
- Graphics & Stuff
- Help:
- New User Info
- |
- FAQ
- |
- Group Info
- |
- Glossary
- |
- Forums
- |
- |
- Contact Admin

