
QNT Black & white & colorful all over Round #3
Launch gallery slideshow
| Group: | Quilts n' Things |
| Swap Coordinator: | perkl8r (contact) |
| Swap categories: | Quilting Sewing |
| Number of people in swap: | 14 |
| Location: | Regional - USA |
| Type: | Type 3: Package or craft |
| Last day to signup/drop: | August 31, 2018 |
| Date items must be sent by: | September 14, 2018 |
| Number of swap partners: | 1 |
| Description: | |
|
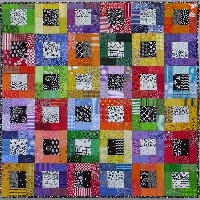
QNT Black & white & colorful all over Round #3 8-31-18 thru 9-14-18 --1 partner --2 different blocks to your partner --green on round #3 I have been wanting to make this colorful quilt for a little while so I am hoping others will want to as well. This block series will be a great way to use up some small scraps of fabrics from our stash, or you can go buy more fabric in quarter yard cuts..…you have my permission! Each month we will exchange 2 different blocks with one partner, and keep 2 blocks for ourselves. Please note that the instructions below are for ONE block only, you will have to repeat it 4 times to get the suggested 2 different blocks to send and 2 blocks to keep. *use 1/4 inch seam allowance to end up with a 8 1/2 inch block Bright colored prints are best for the border fabrics. This series we will use print fabrics only, no solids. Small prints work better for these blocks than large prints. Cutting instructions for one block: Cut 2 different black and white prints into rectangles: 2 ½” X 4 ½” Cut 6 green prints into rectangles: 2 ½” X 4 ½” (the sample picture was assembled with 4 to 6 different red prints) Assembly per block: 1.Sew the 2 black and white prints together to create center of the block. (assemble on the 4 ½ inch side, NOT at the end of 2 ½” side.) This creates your center. Press seams. 2.Attach a green print rectangle to each end of center block. (lay center block on the table with the 4 ½” side closest to you) Attach one green print rectangle to each end on the left and right. Press. 3.Sew 2 green rectangles together end-to-end on the 2 1/2“sides making a long rectangle. Repeat with the other 2 green rectangles. Attach one of these units to the top and one to the bottom of the block. Press. I hope my instructions are clear, and if they are not, please let me know. I love to look at an assembled block as my example so you can look at the picture on this swap to see what you will end up with. FUTURE ROUNDS our black and white centers will have: ROUND # 4 yellow print borders ROUND # 5 purple print borders ROUND # 6 pink print borders ROUND # 7 orange print borders Have fun and swap-on! | |
Discussion
Leave a Comment
You must be logged in to leave a comment. Click here to log in.
- Info:
- Home
- |
- About
- |
- Forum Rules
- |
- Terms of Use
- |
- Press
- |
- Advertising
- |
- Blog
- |
- Graphics & Stuff
- Help:
- New User Info
- |
- FAQ
- |
- Group Info
- |
- Glossary
- |
- Forums
- |
- |
- Contact Admin